Floating licensing
Floating licensing
Floating licensing works by installing and running a server on a computer in the local network or on a dedicated server. Installation of the server is covered in this page below. First let's look at the client-side activation
Running Autograph with a floating license
After installing the software and launching Autograph for the first time, the node-locked licensing page appears. Click on the Use a floating License instead link at the bottom.

This will take you to the floating server configuration page.
After successfully obtaining a lease from the floating server, subsequent runs of Autograph will attempt to directly get a lease from the same server to avoid showing the server configuration page again on start-up. If you want to drop the active lease or change server configuration, you can do so by clicking on Deactivate in the License Management section of the Preferences.
The Floating server address should be the IP address or URL of the server. The server port should be the one that was passed to the config.xml file of the server. If the server is hosted on a remote server via HTTPS, you should set the port to 443.
If the server is only accessible through a proxy server, you should enter the proxy server address such as http://user:password@127.0.0.1:8080
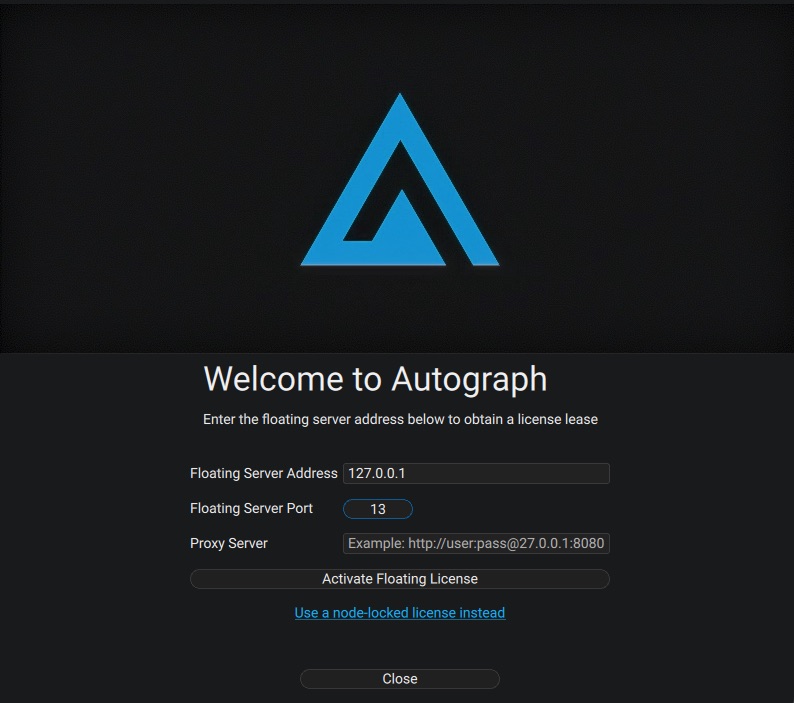
Clicking on Activate Floating License will contact the floating server instance and try to get a lease from it. When successful, the dialog page will close and show Autograph. In case of any error, the error message will be visible at the bottom of the page. Make sure that the server address and port are correct and the computer on which the server is hosted accessible on the network.
When using a floating license, you are not logged-in to a Left Angle user account. Any functionnality linked to your Left Angle account are not accessible.
Activating the Floating Server
Before you can use Floating Server it must be activated. To activate the Floating Server online simply pass the product key like this:
FloatingServer.exe -a="ABCD-EFGH-IJKL-MNOP-QRST-UVWX" -config="C:\\Absolute\\Path\\To\\config.xml" -pdets="C:\\Absolute\\Path\To\\AutographStudio.dat"
Online activation connects to the activation servers using port 80 (HTTP) or port 443 (HTTPS). If you specify a proxy in the configuration file, then the Floating Server instance will try to connect to the activation servers through that.
If you've already activated and you want to re-activate, then you don't need to pass a new product key. You can just call Floating Server with the "-a" commandline argument.
Running the Floating Server
Once activated, the server can be run by using the "-x" commandline argument:
FloatingServer.exe -x -config="C:\\Absolute\\Path\\To\\config.xml" -pdets="C:\\Absolute\\Path\To\\AutographStudio.dat"
Installing and running the Floating Server as a service
On Windows and macOS, you can use a simple commandline switch "-i" to setup your Floating Server. On success, the program returns 0, on failure it returns non-zero.
On Windows this "installation" does three things:
-
It installs the Floating Server instance as a Windows Service set to start with the computer and run silently in the background.
-
It configures the Floating Server to allow inbound connections in the Windows Firewall (unless the Windows Firewall service is disabled, in which case it skips this step).
-
It starts the Floating Server immediately.
On macOS this "installation" does two things:
-
It installs the Floating Server instance as a "launchd" daemon set to start with the computer and run silently in the background.
-
It starts the Floating Server immediately.
If you have any firewall software running on macOS then you'll have to set it to allow incoming connections to the Floating Server instance.
On Windows, start an "Elevated" command prompt (right click "cmd" in the start menue, then click "Run as Admin"). Then, in the elevate command prompt run the following:
FloatingServer.exe -i -config="C:\\Absolute\\Path\\To\\config.xml" -pdets="C:\\Absolute\\Path\To\\AutographStudio.dat"
Or, on macOS:
sudo ./FloatingServer -i -config="/Users/absolute/path/to/config.xml" -pdets="/Users/absolute/path/to/AutographStudio.dat"
On Linux, installing the Floating Server as a service is not supported out of the box, however you can manually build an init script yourself (for systemd, upstart or any other init system) to launch the server instance upon the computer's start.
When running from your init script, you can run the following command-line to start the server:
/path/to/FloatingServer -d -silent -config="/absolute/path/to/config.xml" -pdets="/absolute/path/to/AutographStudio.dat"
Uninstalling the Floating Server (macOS and Windows)
To uninstall the Floating Server simply use the "-u" commandline switch. Again, you'll need to run the command from an elevated command prompt:
FloatingServer.exe -u -config="C:\\Absolute\\Path\\To\\config.xml" -pdets="C:\\Absolute\\Path\To\\AutographStudio.dat"
Or, on macOS:
sudo ./FloatingServer -u -config="/Users/absolute/path/to/config.xml" -pdets="/Users/absolute/path/to/AutographStudio.dat"
On Windows this "uninstallation" does three things:
-
It stops the Floating Server immediately.
-
It removes the Windows Firewall configuration settings for the Floating Server instance if both of the following conditions are met: The Windows Firewall settings were setup during the installation. The Windows Firewall service is running at the time the uninstallation is taking place.
-
If either one of those conditions isn't true, then the uninstallation process simply skips this step.
-
It removes the Floating Server instance from the Windows Services.
On macOS this "uninstallation" does two things:
-
It stops the Floating Server immediately.
-
It removes the Floating Server instance from the "launchd" daemons list.
For both Windows & macOS this uninstallation process leaves the files intact (FloatingServer.exe, config.xml, and resources.dat). If you want the files removed you'll have to remove them after using the "-u" commandline switch.
Deactivating the Floating server
If you want to move the Floating Server from one computer to another computer you have to deactivate from the first computer before they can activate on the second computer:
FloatingServer.exe -deact -config="C:\\Absolute\\Path\\To\\config.xml" -pdets="C:\\Absolute\\Path\To\\AutographStudio.dat"
Upgrading the Floating server
We're continually improving the Floating Server, fixing bugs, improving performance and adding features.
Upgrading the Floating Server instance is simple:
-
Stop the running old instance of the Floating Server.
-
Replace the old FloatingServer.exe with the new version.
-
Start the Floating Server instance again.
Configuring the Floating Server
The config.xml file passed to the Floating Server allows to control several behaviors of the server. or most end-users almost all of the configuration settings will be good out of the box. And because the configuration file is an XML file, some characters can't be used because they have a special meaning in XML files. The appropriate "XML entities" must be used in their place:
Use this... ...in place of this
& &
< <
> >
" "
' '
The configuration file is only loaded at the start of Floating Server. If you make any changes to the configuration file while the Floating Server is running they'll be ignored until the next time the Floating Server is started.
<log .../> (Required)
This element configures the log file to write errors, warnings, and any information. For example:
<log file="tfs-log.txt" level="warning"/>
"file" attribute
Where the log file will be written / appended to. The floating license server must have access to this file and the directory must exist.
You can use either absolute path or a relative path. If you use a relative path then the log file will be written relative to the Floating Server executable file. "level" attribute
The amount of information you want Floating Server to output to the log file. These are the possible level settings:
-
notification: Records when leases are created, removed, expired, and other nonessential, but possibly interesting information. This level also includes all other level outputs (warning, error).
-
warning: Records things that are wrong with your configuration or other things that need to be fixed. This level also includes the next level of output (error).
-
error: Records when Floating Server fails to do things it needs to do. For example, failures to load configuration data, failure to process data, etc.
-
none: No log file will be written.
<bind .../> (Required)
Setup the port you want the Floating Server to bind to. For example:
<bind port="13"/>
The Floating Server instance will listen for TCP connections on this port for both IPv4 and IPv6. If the system doesn't support IPv6, then the Floating Server instance will only listen on IPv4. <cpu .../> (Required)
Setup how many worker threads you want the server to use. We recommend setting this to 1 thread per CPU "core". If you set this value to "0" then Floating Server will automatically detect how many cores the computer has and use that value. For example:
<cpu threads="0"/>
<lease .../> (Required)
Setup how long a license lease should last. The time is in seconds. We recommend 30 minutes (i.e. 1800 seconds):
<lease length="1800"/>
The shorter you make this time the more often the "client" programs will have to contact this server, and thus the more load on the server and the more traffic on the network. The only time "long" leases will be a problem is if the client programs end abruptly without first telling the server that the lease is no longer needed. Thus a "zombie" lease will take up one of the lease slots until it expires.
The absolute minimum time you can use is 30 seconds. <isgenuine .../> (Required)
Set how often to recheck this Floating Server's activation. This Floating Server instance will contact the activation servers through wyday.com on port 443. (So, https://wyday.com must be whitelisted for this process so that it can contact those sites). "days_between" attribute
How many days between check. Minimum 1. Maximum 90. We recommend 90. "grace" attribute
The number of grace period days on an internet failure. Maximum 14.
<isgenuine days_between="90" grace="14"/>
<proxy .../> (Optional)
The proxy that this Floating Server instance will need to use when it needs to contact wyday.com to activate, re-activate, and verify with the servers.
<proxy url="http://user:pass@127.0.0.1:8080/"/>
Configuring Floating Server for HTTPS communication
The Floating Server supports HTTPS communication. In addition to (or in place of) the default "raw" binary communication over the port you specified in the "bind" element, you can configure the Floating Server to communicate over HTTPS. You can do this by "binding" the Floating Server to an address and port for SCGI communication with an existing web server (e.g. Apache, NGINX, etc.).
This guide covers the very basics of the HTTPS server configuration. We assume you have experience running an HTTPS server.
In the example config.xml file you'll see an XML element like this:
There are 3 options to configure:
-
The "just_scgi" attribute: Set this to "false" and raw, unencrypted connections, will still be allowed. Set this to "true" and only connections over SCGI (via an HTTPS server) will be accepted and the global bind element will be ignored.
-
The "address" attribute in the "bind" element : Set this to the address you want the HTTPS server that sits in front of the Floating Server to connect to.
-
If the address is not present, the server accepts TCP / IP connections on all server host IPv6 and IPv4 interfaces if the server host supports IPv6, or accepts TCP / IP connections on all IPv4 addresses otherwise. Use this address to permit both IPv4 and IPv6 connections on all server interfaces. This value is the default.
-
If the address is ::, the server accepts TCP/IP connections on all server host IPv4 and IPv6 interfaces.
-
If the address is 0.0.0.0, the server accepts TCP/IP connections on all server host IPv4 interfaces.
-
If the address is a "regular" IPv4 or IPv6 address (such as 127.0.0.1 or ::1), the server accepts TCP/IP connections only for that IPv4 or IPv6 address.
-
The "port" attribute in the "bind" element : Set this to the port you want the HTTPS server that sits in front of the Floating Server to connect to.
For security sake, we recommend always bind to a local address (like "127.0.0.1") so that all data that touches the Floating Server must first go through an HTTPS server.
Configure the HTTPS server (Apache)
If you're using the Apache HTTPS server, modify your httpd.conf file to enable the scgi module (so Apache can communicate with the Floating Server instance):
    LoadModule proxy_module modules/mod_proxy.so
    LoadModule proxy_scgi_module modules/mod_proxy_scgi.so
    LoadModule ssl_module modules/mod_ssl.so
Next add a "VirtualHost" element that will accept HTTP connections and pass them along to the Floating Server:
    <VirtualHost yourhostaddress:443>
        # Pass *everything* to the Floating Server via SCGI
        SetEnvIf Request_URI .* proxy-scgi-pathinfo
        ProxyPass / scgi://127.0.0.1:42/

        # ServerName gives the name and port that the server
        # uses to identify itself. This can often be determined
        # automatically, but we recommend you specify it
        # explicitly to prevent problems during startup.
        ServerName yourhostaddress:443

        # Turn SSL on
        SSLEngine on
    </VirtualHost>
Replace "yourhostaddress" with the address name that the Floating Server instance will be accessed from (i.e. the "public" address -- even if that "public" address is local network specific). Also, if you changed the SCGI "address" or "port" in the config.xml file you'll also need to change the "ProxyPass" directive to use the address and port you changed them to.
Configure the HTTPS server (Nginx)
If you're using the NGINX HTTPS server, first make sure your NGINX has been compiled with the SCGI module. You can do this by running "nginx -V" via commandline and you should see something like this:
    nginx version: nginx/1.15.7
    built by gcc 5.4.0 20160609 (Ubuntu 5.4.0-6ubuntu1~16.04.10)
    built with OpenSSL 1.1.1a  20 Nov 2018
    TLS SNI support enabled
    configure arguments: --sbin-path=/usr/local/sbin --with-http_ssl_module --with-http_v2_module --without-http_uwsgi_module --with-pcre-jit --with-threads
If you don't see --without-http_scgi_module in the configure arguments, then you know the NGINX instance was compiled with the SCGI module. It's compiled by default, so it should be available in every vanilla distribution of NGINX.
Next, modify your nginx.conf file to pass all communication to the address / port of your choosing to the Floating Server instance via SCGI:
    server {
        listen 443 ssl http2;
        listen [::]:443 ssl http2;

        server_name  yourhostaddress;

        # Maximum "request" size (i.e. max size the client sends us)
        client_max_body_size 10m;

        # pass every connection to the Hosted TFS on this machine.
        location / {
            scgi_param  SCGI               1;
            scgi_param  HTTPS              $https if_not_empty;
            scgi_param  REQUEST_METHOD     $request_method;
            scgi_param  CONTENT_LENGTH     $content_length;
            scgi_param  REMOTE_ADDR        $remote_addr;
            scgi_pass   127.0.0.1:42;
        }
    }
Replace yourhostaddress with the address name that the Floating Server instance will be accessed from (i.e. the "public" address -- even if that "public" address is local network specific). Also, if you changed the SCGI "address" or "port" in the "FloatingServer-config.xml" file you'll also need to change the "scgi_pass" directive to use the address and port you changed them to.
Once both the Floating Server and HTTPS servers are successfully started, you're ready to test if the Floating Server is accessible via HTTPS. You can do this by opening a browser on your computer and typing the host address you've configured in your HTTPS server configuration.
So, in this example, "yourhostaddress" is the address that the HTTPS server is accessible from. Type, "https://yourhostaddress" into your browser, and the page should confirm you've configured everything correctly.
Extra activation data
If you see a certificate error page, then make sure you're using SSL certificates signed by a Certificate Authority. There are multiple options available, but the best certificate authority (CA) is free (Let's Encrypt).